What is Docker?
Docker is a tool for running processes in an isolated environment called a container. It’s like a virtual machine but it doesn’t need opereting system. No matter if we run our application on linux, macOS or windows everywhere will be work the same. In contrast to “normal publish” where – we move our release versions between different systems or even different versions of the same system that might not work for us.
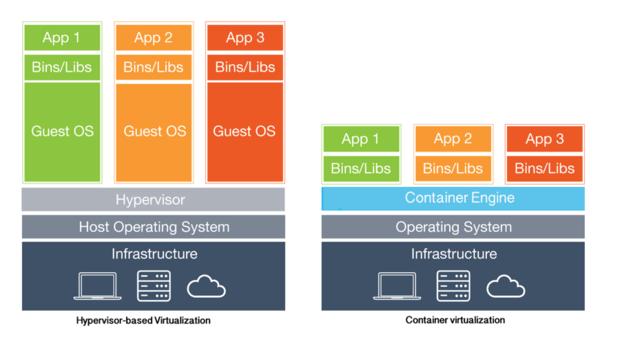
There is the graphic difference between VM and Docker. Pay attention to how much the resource consumes “Guest OS (System operations)” in VM.

For more information what is docker I refer to the link.
How to configure Docker in Windows.
Now let’s see how we can configure Docker in windows.
First we need to install docker (here is tutorial for Windows, MacOS and Linux).
We need a some project. In my example will be a Asp.Net Core MVC.
Let’s use SDK which offers us microsoft and create a project from the console. Go to your folder and write dotnet new mvc that will create example project based on MVC. There is alot of option that SDK offerds – just write the dotnet –help in console to see them. But I won’t write about it in today’s post.

After use dotnet run we should get a example page.

Ok. Now let’s create a Dockerfile without any extension, it will define the imaging configurations based on this project.

FROM microsoft/dotnet:latest
COPY . /app
WORKDIR /app
RUN ["dotnet", "build"]
EXPOSE 5000/tcp
ENV ASPNETCORE_URLS http://*:5000
ENV ASPNETCORE_ENVIRONMENT development

ENTRYPOINT ["dotnet", "run"]
FROM – It informs that we will use an image called microsoft/dotnet which is sufficient to launch the Asp.Net Core.
COPY/WORKDIR – It copies the current contents of the directory to a new one called app and sets this directory as the default for subsequent instructions.
EXPOSE – to expose on port 5000 outside the world.
ENV ASPNETCORE_URLS – It binds the port and address of our application.
Now we can create image docker.
docker build -t someapp .
The -t parametr adds a tag to our image in our example it’s “someapp”. The “.” on the end says that we want to use the dockerfile in the current directory.
We can check our images with:
docker images
After build we can try run our application localy with docker.
docker run -d -p 5000:5000 someapp
The -d parametr allows you to run an application in detached mode that means it will run in the background and parametr -p sets port mapping. Now our application should work on http://localhost:5000/.
To see the currently active images, you should write a command:
docker ps

Now we can put our image into the cloud like digital ocean, docker hub and so on.
But what if we’ve got many services like database, rabitMq and etc?For each instance I have to make a separate image?
So that’s where a Docker Compose in. But about docker compose I will write in subsequent posts.


Po co na polskiej stronie pisać po angielsku? 😐
Why not? 😉
No bo końcówka .pl 😀 Miałem dysonans poznawczy! Zrób ankiete: “Jaki jest Twój natywny język?” i zobaczysz że 80% będzie polski (a pozostałe 20% pewnie napisze: java, .net, c++… :P).
Moim zdaniem warto pisać po angielsku, zawsze przyniesie to dodatkową korzyść dla piszącego i czytającego.